Saturday, January 31, 2015

PySide Tree Tutorial IIIA: Introducing the TreeModel class

Part of a series on treebuilding in PySide: see Table of Contents.

We discussed models in abstract terms in Part I, then showed how to build a Python tree structure in Part II, and now we will look in more concrete terms how to construct our TreeModel, which is subclassed from QAbstractItemModel.

Recall from Part I that the TreeModel class instantiates the API required by the view, acting as a wrapper for the hierarchical data structure discussed in Part II. The TreeModel class is defined as follows:
 1
 2
 3
 4
 5
 6
 7
 8
 9
10
11
12
13
14
15
16
17
18
19
20
21
22
23
24
25
26
27
28
29
30
31
32
33
34
35
36
37
38
39
40
41
42
43
44
45
46
47
48
49
50
51
52
53
54
55
56
57
58
59
60
61
62
63
64
65
66
67
68
69
70
71
72
73
74
75
76
77
78
79
80
81
82
83
84
85
86
87
88
class TreeModel(QtCore.QAbstractItemModel):
    def __init__(self, data, parent=None):
        super(TreeModel, self).__init__(parent)
        self.rootItem = TreeItem(("Title", "Summary"))
        self.setupModelData(data.split('\n'), self.rootItem)

    def columnCount(self, parent):
        if parent.isValid():
            return parent.internalPointer().columnCount()
        else:
            return self.rootItem.columnCount()

    def data(self, index, role):
        if not index.isValid():
            return None
        if role != QtCore.Qt.DisplayRole:
            return None
        item = index.internalPointer()
        return item.data(index.column())

    def flags(self, index):
        if not index.isValid():
            return QtCore.Qt.NoItemFlags
        return QtCore.Qt.ItemIsEnabled | QtCore.Qt.ItemIsSelectable

    def headerData(self, section, orientation, role):
        if orientation == QtCore.Qt.Horizontal and role == QtCore.Qt.DisplayRole:
            return self.rootItem.data(section)
        return None

    def index(self, row, column, parent):
        if not self.hasIndex(row, column, parent):
            return QtCore.QModelIndex()
        if not parent.isValid():
            parentItem = self.rootItem
        else:
            parentItem = parent.internalPointer()
        childItem = parentItem.child(row)
        if childItem:
            return self.createIndex(row, column, childItem)
        else:
            return QtCore.QModelIndex()

    def parent(self, index):
        if not index.isValid():
            return QtCore.QModelIndex()
        childItem = index.internalPointer()
        parentItem = childItem.parent()
        if parentItem == self.rootItem:
            return QtCore.QModelIndex()
        return self.createIndex(parentItem.row(), 0, parentItem)

    def rowCount(self, parent):
        if parent.column() > 0:
            return 0
        if not parent.isValid():
            parentItem = self.rootItem
        else:
            parentItem = parent.internalPointer()
        return parentItem.childCount()

    def setupModelData(self, lines, parent):
        parents = [parent]
        indentations = [0]
        number = 0
        while number < len(lines):
            position = 0
            while position < len(lines[number]):
                if lines[number][position] != ' ':
                    break
                position += 1
            lineData = lines[number][position:].strip()
            if lineData:
                # Read the column data from the rest of the line.
                columnData = [s for s in lineData.split('\t') if s]
                if position > indentations[-1]:
                    # The last child of the current parent is now the new
                    # parent unless the current parent has no children.
                    if parents[-1].childCount() > 0:
                        parents.append(parents[-1].child(parents[-1].childCount() - 1))
                        indentations.append(position)
                else:
                    while position < indentations[-1] and len(parents) > 0:
                        parents.pop()
                        indentations.pop()
                # Append a new item to the current parent's list of children.
                parents[-1].appendChild(TreeItem(columnData, parents[-1]))
            number += 1

Each TreeModel instance is initialized with:

    def __init__(self, data, parent=None):
        super(TreeModel, self).__init__(parent)
        self.rootItem = TreeItem(("Title", "Summary"))
        self.setupModelData(data.split('\n'), self.rootItem)

The model invokes setupModelData() to create the hierarchical tree structure discussed in Part II. We will discuss this method briefly in post IIID. Recall that the rootItem is the highest-level node in the tree structure, and is the parent of each top-level item in the tree (Figure 5, post IIB).

Within TreeModel, every method except setupModelData() is part of the API for use by the view. In post IA, we mentioned that the complexity of the API will depend on the type of model you are building. Because we are subclassing QAbstractItemModel, our API must include five methods: rowCount(), columnCount(), data(), index(), and parent(). Further, while it is optional, most models also provide a headerData() method, and ours is no exception.

The view uses index() and parent() to help it navigate the tree structure. Recall from  post IIB that indexes are a kind of lingua franca used for interactions between models and views. While the model creates all the indexes and sends them to the view, they don't just disappear there. Rather, the view, in turn, sends these indexes back to the model as parameters when making queries, to specify which item it is asking about.

We have read a lot about indexes up until now: what, exactly, is an index? An index is really just a bundle of methods. While some of the methods are used to locate items in the model, there is additional functionality, some described in Table 1. We'll see each of the methods from Table 1 used in TreeModel: see the online documentation for a full inventory.

Method Description
index.row() Returns the row number of the index.
index.column() Returns the column number of the index.
index.parent() Returns the index of the parent corresponding to the given index.
index.internalPointer() Returns the TreeItem corresponding to index.
index.isValid() Returns True if the index is valid, False otherwise.
Table 1: Index methods

There is one index that deserves special attention, as it will be used in every method in the model's API: the invalid or null model index. Instantiated with QtCore.QModelIndex(), it is unique in that its row() and column() methods return invalid negative values, and its internalPointer() method returns None. This indicates that it contains no data for the view to display in the tree. Interestingly, the root item in our tree is assigned the invalid index, so in that sense the invalid index is the parent index of all top-level items in the model.

While we call its index the 'invalid' index, this isn't to say that the root index is unimportant to the view. In its initial rendering of the tree, the view starts by looking at all the items that have the invalid parent index, and then moves down from there, traversing the tree to determine which items to show. So the invalid index acts as a virtual apical index in our tree structure, serving as the place where the buck stops when the view is looking for data to display.

In the next two posts, we will go through the methods instantiated in TreeModel.

Thursday, January 29, 2015

PySide Tree Tutorial IID: Adding helper methods to TreeItem

Part of a series on treebuilding in PySide: see Table of Contents.   

In part IIB we saw how to build a tree structure out of TreeItem instances. What we didn't discuss there is that each TreeItem comes packed with additional methods that will help us construct our tree model. Most of these methods let us extract simple data from a TreeItem, such as its parent, or the text from one of its columns. In this post, we'll go over these methods.

Via the child() method, an item returns one of its children from the given row:

def child(self, row):
    return self.childItems[row]

Recall from Figure 2 (post IB) that in tree models, children are arranged as a set of rows underneath their parents. Hence, to pick child n from a parent, just select the nth member from the parent's childItems list.

The number of children an item has is calculated in childCount():

def childCount(self):
    return len(self.childItems)

This just returns the length of the list that contains all the children.

The row() method reports an item's position among its siblings. For example, in Figure 5 (post IIB), the item marked A occupies row 0 among its siblings, while item D has the same parent, and occupies row 1. Item C is a child of A, and occupies row 1 among A's children.  

row() is implemented as follows:


def row(self):
    if self.parentItem:
        return self.parentItem.childItems.index(self) 
    return 0 

We should note a couple of things about row(). First, index() in this case has nothing to do with the model indexes mentioned in post IB: it is simply the built-in Python method that returns the index at which a given value occurs in a list. Second, our convention is that the root item is automatically assigned to row 0, even though it has no parent (Figure 5).


The number of columns of data associated with an item is returned by columnCount():

def columnCount(self):
    return len(self.itemData) 

Each item in our data structure contains the same number of columns, so we could have simply returned 2, but we have opted for a more general approach.

The data() method lets you extract the textual data from a particular column in a row (recall Figure 4, post IIB). It simply retrieves the text from the appropriate column stored in itemData:

def data(self, column):
    try:
        return self.itemData[column]
    except IndexError:
        return None

Note that data() returns None if the column index is out of range.

An item's parent is returned, surprisingly enough, from parent():


def parent(self):
    return self.parentItem

This will return None for the root node.

Summary
There you have it: we have built a beautiful tree of data, along with some methods that the model will use to extract different features of its nodes. What is interesting is that, up until now, we have officially done zero PySide programming. We have done all our work with standard Python classes, without importing QtGui, QtCore, or any other PySide classes. In the next section we will finally do some PySide programming, and look at how to wrap a model around this tree.

Tuesday, January 27, 2015

PySide Tree Tutorial IIC: Cross-examining simpletreemodel

Part of a series on treebuilding in PySide: see Table of Contents. 
 
In this tutorial, we are following simpletreemodel to the letter, simply trying to understand the code as given. But we should not assume that there is no room for improvement. For instance, in the code in post IIB, when initializing a TreeItem it would be helpful to add:

if parent is not None:
      parent.appendChild(self)

This would let us add a child to its parent immediately, right when the child is created. A significant simplification of the code. If you have other ways we might optimize the code, by all means let us know in the comments!

Further, if our goal was truly to build a simple, read-only model with a data store as small as the one that comes with this example, then we would weigh options other than QAbstractItemModel. In particular, we would want to consider using QTreeWidget or QStandardItemModel, which provide simplicity and ease-of-use in exchange for diminished speed and flexibility. In Part V, we will see how to create a tree like the one in our example using these tools. You'll see that the code is much simpler.

However, for larger models that require more flexibility and speed, you will probably end up subclassing QAbstractItemModel. In that case, simpletreemodel provides a useful template. While it was never meant to be a fully optimized industrial-grade example, it is helpful precisely because it provides a minimal working prototype to help people get their bearings, and contains little extraneous fluff.

Monday, January 26, 2015

PySide Tree Tutorial IIB: From TreeItem to tree structure

Part of a series on treebuilding in PySide: see Table of Contents. 

Recall from post IIA that the two classes we will focus on most are TreeItem and TreeModel. We'll start with TreeItem.

Each instance of TreeItem represents a node in our data tree, and we will bind multiple such items together into a hierarchical representation of all the data in our data set. As we will see, each node contains the text from one row of the model, as well as information about that node's relationship to other nodes in the tree.

The TreeItem class is defined as follows:

 1
 2
 3
 4
 5
 6
 7
 8
 9
10
11
12
13
14
15
16
17
18
19
20
21
22
23
24
25
26
27
28
29
30
31
class TreeItem(object):
    def __init__(self, data, parent=None):
        self.parentItem = parent
        self.itemData = data
        self.childItems = []

    def appendChild(self, item):
        self.childItems.append(item)

    def child(self, row):
        return self.childItems[row]

    def childCount(self):
        return len(self.childItems)

    def columnCount(self):
        return len(self.itemData)

    def data(self, column):
        try:
            return self.itemData[column]
        except IndexError:
            return None

    def parent(self):
        return self.parentItem

    def row(self):
        if self.parentItem:
            return self.parentItem.childItems.index(self)
        return 0

When instantiated, a TreeItem receives two inputs: data (a two-element list of strings) and  parent (which is typically another TreeItem):

def __init__(self, data, parent=None):
    self.parentItem = parent
    self.itemData = data
    self.childItems = []

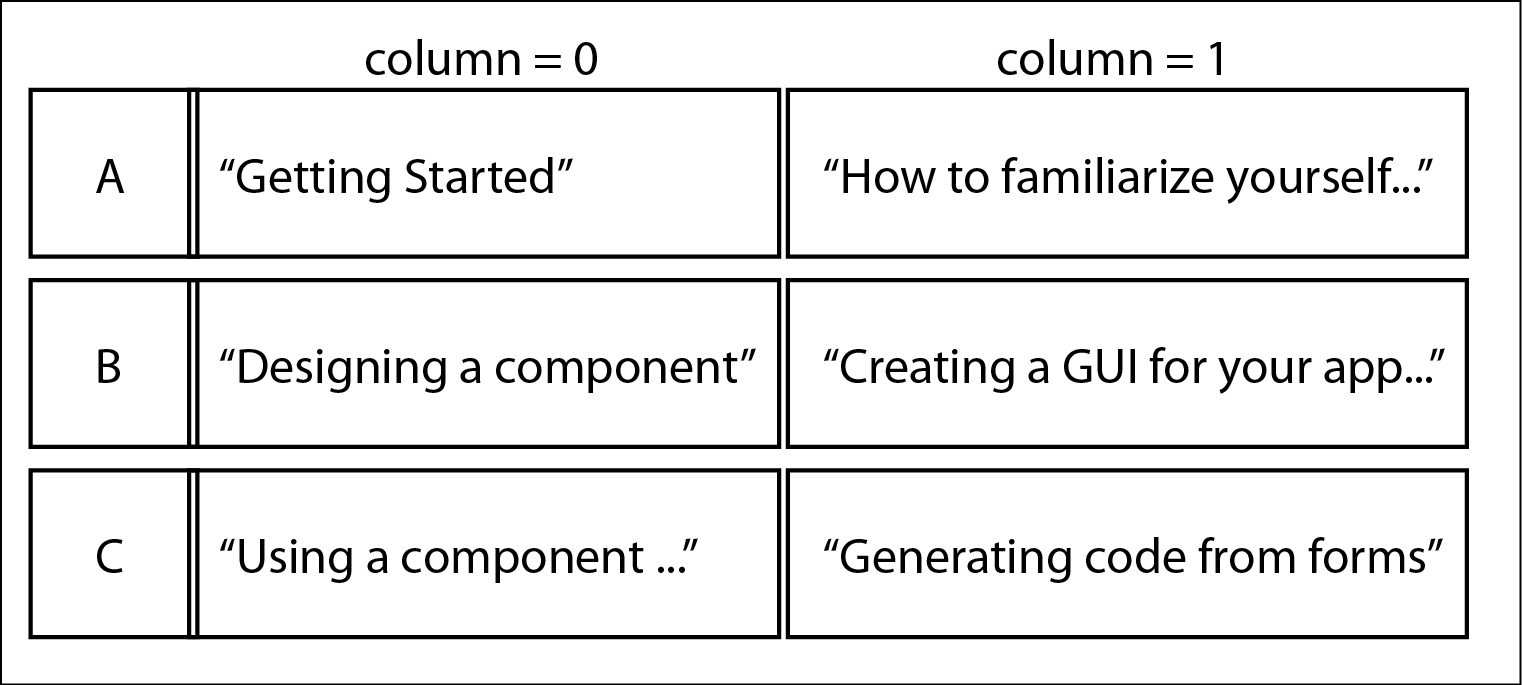
Each TreeItem stores important data about its node. As illustrated in Figure 4, each node contains a full row of data, which consists of two columns (the title and summary). This columnar data is contained in itemData as a two-element list of strings.

Figure 4: Each TreeItem represents a row of the model
The diagram depicts how the title and summary information are stored in TreeItems A, B and C. Each TreeItem represents a row of data. The itemData attribute is a list that contains the data from each column. For instance, B.itemData[1] contains the string "Creating a GUI for your application."

In addition to storing an item's first-order data in itemData, each TreeItem also contains attributes that specify the item's place in the tree structure. Namely, it includes the item's parent (parent) as well as a list of the item's children (childItems). We can fully specify our tree's topography by appropriately setting these attributes for each node.

We can build our data tree using a simple and intuitive construction procedure. First, create the root TreeItem, which is the node with no parents. That is, the root item is the ancestor of all nodes in the tree, but a child of none:

rootItem = TreeItem(["Title", "Summary"], parent = None)

Note that the root's itemData contains the model's horizontal header data, but this is just for convenience: we could just as easily have sent it two empty strings. To attach children to the root item, we call TreeItem again, but with rootItem as the parent:

child0 = TreeItem(["Getting Started", "How to familiarize yourself..."], rootItem)
child1 = TreeItem(["Designing a component", "Creating a GUI for your app..."], rootItem)

Then, to add a child to one of these items, for instance to give child0 a child, we would follow the exact same procedure:


child00 = TreeItem(["Launching designer", "Running the Qt Designer app..."], child0)

Such iterative construction of TreeItems is all we need to generate our tree's basic skeleton, like the one illustrated in Figure 5.

Figure 5: The tree is built out of TreeItems.
TreeItems are connected together into a tree. As described in the text, we start with the root item, and proceed from there, instantiating new TreeItems with the root item as the parent, iterating this process until we have constructed the entire tree. Each item's row number, relative to its siblings, is indicated to the right.

There is one more step we must take to finish building our basic tree: we must fill in values for the childItems attribute. You probably noticed that when initialized, the childItems list started out empty. Once we have a population of TreeItems connected appropriately, we can use TreeItem.appendChild() to populate childItems:

def appendChild(self, item):
    self.childItems.append(item)

For instance, to add the children to the items defined above:

rootItem.appendChild(child0)
rootItem.appendChild(child1)
child0.appendChild(child00)

Once we have appended all the children to each item, then we are done building the tree! This tree structure serves as the data store with which our model will directly interact.

Note that the simpletreemodel example is a read-only model, so once the tree is grown it is frozen in place: its topography never changes. Hence, we will see (Part III) that appendChild() is only used in one place in our code: when initially constructing the tree with setupModelData(). Therein, creating a node and appending it to its parent are done in one line. For instance:

rootItem.appendChild(TreeItem(["Getting Started", "How to familiarize yourself..."], rootItem)

This line carries out the same operations as above, but in a more compact way.

If building a tree was our only goal, we would be done. But we want to display this tree using PySide. Since our model will need to provide certain methods for use by the view, we supplement each TreeItem instance with some additional methods that will help us build the model in Part III. We'll briefly look at each of these methods in Post IID.

But first, as an aside in Post IIC, we will briefly discuss other ways we might build a tree in PySide.

Friday, January 23, 2015

PySide Tree Tutorial IIA: An introduction to simpletreemodel

Part of a series on treebuilding in PySide: see Table of Contents. 

The simpletreemodel example that comes with PySide includes the following files:
simpletreemodel.py     #the main program
simpletreemodel_rc.py  #compiled resource file
default.txt            #text file of data in GUI
 The GUI displays a tree view of the Table of Contents of a Qt Designer tutorial (Figure 3). It provides basic keyboard navigation that is the default in all tree views (e.g., pressing the right arrow expands an item to show its children). Note that each row in the view contains two columns of data: a title (e.g.,'Getting Started') and a summary (e.g., 'How to familiarize yourself with Qt Designer').

Figure 3: The GUI created by the application

There are two main classes defined in simpletreemodel.py:
  1. A home-grown TreeItem class that represents individual rows in the tree. Our data store consists of multiple TreeItem instances connected into a hierarchically organized tree.
  2. A TreeModel class, subclassed from QAbstractItemModel, that serves as a wrapper for the data structure built out of TreeItems. It implements the API needed by the view (as discussed in post IA).
Parts II and III of this series will focus on these two classes, respectively.

Before moving on in the tutorial, I strongly recommend that you check to make sure that simpletreemodel runs as expected on your system. If it does not, then feel free to ask for help in the comments.

Tuesday, January 20, 2015

PySide Tree Tutorial IB: Models and Views -- The mighty index

Part of a series on treebuilding in PySide: see Table of Contents

One useful innovation in the development of the model/view framework is the use of indexes. Indexes are unique objects created by the model, with one index created for each separate item of data to be displayed by the view (e.g., each box in Figure 2). They act as wrappers that contain useful information about each individual data item.

The view uses these indexes to specify the location of the item about which it is making a query. This is analogous to using an index to pull a value from a simple Python list. However, as illustrated in Figure 2, uniquely specifying the location of an item in a data model is a bit more complicated. For instance, in a table model, specifying an item's location requires two numbers (the row and column of the item), and in a tree model three parameters are required (the row, column, and the index of the parent).


Figure 2: Indexes in tables and trees
A. Table model (rows and columns) Visual representation of a table model in which the location of each item is fixed by a row and a column number. We obtain the model index that refers to a data item by passing the relevant row and column numbers (and  a third optional parent parameter) to the model's index() method:

    indexA = model.index(0, 0, QtCore.QModelIndex())
    indexB = model.index(1, 1, QtCore.QModelIndex())
    indexC = model.index(2, 1, QtCore.QModelIndex())


Note that every item in the model (e.g., items A, B, and C) has the same parent. In general, the top level items in a model always have the invalid index QModelIndex() as their parent (see Part III). Since this is the default parent, for table models it is not required to send it explicitly.

B. Tree model (rows, columns, and parents) Visual representation of a tree model in which each item's location is fixed via a row number, a column number, and the index of its parent. Items A and C are top-level items in the model. Their indexes are obtained with:

    indexA = model.index(0, 0, QtCore.QModelIndex())
    indexC = model.index(2, 1, QtCore.QModelIndex())


Item A has multiple children, including item B. The index for item B is obtained with:

    indexB = model.index(1, 0, indexA)


We see that specifying the position of an item in a tree requires we indicate its parent index in addition to its row and column position.

Figure source:
http://qt-project.org/doc/qt-4.8/model-view-programming.html  

As we will see in Part III, model indexes are much more than bare coordinates. Each index includes multiple methods that supply additional useful information about the corresponding item in the model. For instance, index.internalPointer() returns the entire data item associated with index.

In general, indexes are one of the main mechanisms used to insulate views from raw data: they provide a universal format for the transmission of queries from the view to the model, and the view doesn't have to worry about the details of how the indexes were created.

We have purposely left open the question of how models interact with the data store. This is because data is messy, with no single universal format: you may end up using data from a SQL database, a text file, or even a simple Python list. If your data is in a SQL database and you want to display it as a table, then you will implement a QSqlTableModel. However, you will take a very different strategy if you want your data stored and displayed as a tree. In this case, the case dealt with in simpletreemodel, you will often subclass QAbstractItemModel (though see post IIC and part V).

Before this discussion gets too abstract to be helpful, let's take a break, and start looking at simpletreemodel in Part II.

Monday, January 19, 2015

PySide Tree Tutorial IA: Models and Views -- The Big Picture

Part of a series on treebuilding in PySide: see Table of Contents.

By separating content from appearance, the model/view framework takes a divide and conquer approach to GUI design. That is, the appearance of the data on the screen, handled by the view, is managed separately from the application's interactions with the data store. Such data wrangling is handled by the model.[1] This division of labor makes both of their jobs simpler: the view can ignore the details of how data are handled by the model, while the model can ignore the details of how data are painted to the screen.

As illustrated in Figure 1, views have two main roles:
  1.  Get data from the model by sending the model queries.
    Figure 1: The model/view framework
  2.    Paint the GUI to the screen: the same content can be viewed as a list, table, or a hierarchically organized tree. These different types of views are instances of QListView, QTableView, and QTreeView, respectively.[2]
Models also have two main roles:
  1. Handle all direct interactions with the data store, wrapping data into indexes to be used by the view.
  2.  Implement the expected interface with the view: when the view needs data, we know that the model will provide it using the mandatory interface.
While models and views are equally important, in this tutorial we will focus mainly on how to implement a model. The view class we will use is the factory-made QTreeView, whose default behavior will be fine for our purposes.

As mentioned above, all models are expected to instantiate a certain interface (or API) for the view to use. This API consists of a set of methods that provide views with all the information they need to paint the GUI to the screen. For instance, by invoking the model's data() method, we will see that the view can determine what text needs to be displayed on the screen. One nice feature of the standard views is that they will only request data about items in the model that presently need to be drawn to the screen.

The complexity of the model's API depends on the type of model you want to create. The simplest read-only list models only need to provide two methods: data() and rowCount().  More complex models, such as editable tree models, need to provide many additional methods. For a helpful overview of the methods required for different types of models, see Qt's Model subclassing reference (http://qt-project.org/doc/qt-4.8/model-view-programming.html#model-subclassing-reference).

If this all seems a bit abstract and useless or confusing, don't spend a lot of time struggling over the details. You will get lots of concrete examples in Part II, which is really the meat of this Tutorial.

[1] Note to keep things simple we will ignore the existence of delegates in this synopsis. Delegates control the display of individual data items and editors for said items, but for now we'll just lump this in as part of the view.

[2] For less standard visual representations of data (e.g., a bar graph or pie chart) you would need to make a custom view (Summerfield (2008), Chapter 16).

Saturday, January 17, 2015

PySide Tree Tutorial: Introduction

I think that I shall never see

A poem lovely as a tree.
                      -Joyce Kilmer


I've written an annotated companion to the simpletreemodel example that comes with PySide/PyQt. The code builds and displays a hierarchically organized data structure (i.e., a tree) using a model subclassed from QAbstractItemModel. I spread it out over multiple posts (see Table of Contents below). When finished, I'll put the entire series of posts into a single PDF and put a link to it in this post.

In Part I we will briefly review the model/view framework, focusing on details relevant for implementing our example. In sections II and III, we will study simpletreemodel. Part IV includes suggestions for future study. Part V shows how you can use other tools (QTreeWidget and QStandardItemModel) to construct a similar tree.

Table of Contents
I:Models and Views
            A. The big picture
            B. The mighty index
II: Building the data structure
            A. An introduction to simpletreemodel
            B. From TreeItem to tree structure
            C. Cross-examining simpletreemodel
III: Making the tree model
            A. Introducing the TreeModel class
            B. QAbstractItemModel's API
            C. Index and parent
            D. Creating the tree with setupModelData()

Acknowledgments
This started as a direct translation of the online Qt documentation on model-view programming. The main sources used were:
Also, thanks also to the folks at stackoverflow and qtcentre.org for answering my many questions. Thanks also to Tim Doty, Anna Stenwick, and Mark Summerfield for comments on previous drafts. Feel free to post questions/suggestions/comments in the comments of the relevant posts, or email them to me: thomson.eric at gmail.

References
Summerfield, M (2008) Rapid Gui Programming with Python and Qt. Prentice Hall.
Summerfield, M (2010) Advanced Qt Programming. Prentice Hall.

Tuesday, October 28, 2014

Database from Ch 19 of Teach Yourself Python

Teach Yourself Python is a really good introduction to Python--my favorite out of the three introductory books I own. Chapter 19, on using databases, references a video game database. I couldn't find the database online, so below is the code I used to make it.

# -*- coding: utf-8 -*-
'''Code to construct database from Chapter 19 of 
Teach Yourself Python in 24 Hours by Katie Cunningham'''
import sqlite3

error = None
conn = sqlite3.connect('videoGames.db')
cursor = conn.cursor()
  
#create games table
sqlCreate = '''CREATE TABLE games 
               (title text, rating text, system text, year int)'''
try:
    cursor.execute(sqlCreate)
except sqlite3.OperationalError as e: 
    error = e

#add data, if database doesn't already exist
if not error:
    print "Successfully created database...populating table"
    gameDataAll=[('Tales of the Abyss', 'T', '3DS', 2011),
              ('Adventure Time', 'E10+', '3DS', 2012),
              ('Hollywood Crimes', 'T', '3DS', 2011),
              ('Forza Motorsport 4', 'E', '360', 2011),
              ('Sonic Generations', 'E', '360', 2011),
              ('Forza Horizon', 'T', '360', 2012),
              ('ZhuZhu Pets', 'E', 'Wii', 2012)];
              
    for gameData in gameDataAll:
        print gameData 
        sqlAdd = '''INSERT INTO games (title, rating, system, year)
                    VALUES (:title, :rating, :system, :year)'''
        cursor.execute(sqlAdd, {'title': gameData[0], 'rating': gameData[1],
                                'system': gameData[2], 'year':gameData[3]})   
    conn.commit()  #commit changes otherwise they will not be saved
else:
    print "Didn't create database because", error
    sqlShow = '''SELECT * FROM games'''
    selectResults = cursor.execute(sqlShow)
    allGames = selectResults.fetchall()
    print "\nThe games table contains the following rows:"
    for game in allGames:
        print game
          
#close shop
cursor.close()
conn.close()
Code highlighting done at highlight.me.

Saturday, September 20, 2014

Pyside or PyQt for beginners?

As I mentioned in the previous post, my hobby recently has been porting Summerfield's book from PyQt to PySide (the code is in the PySide Summer repository).

Now that I'm about halfway through done with the translation process, I have inexorably been pulled to favor PyQt over PySide, at least for beginners. This is mainly because it has a more active community working hard to maintain the code, and there is better overall documentation in PyQt than PySide.1
 
This recommendation isn't based on thinking PyQt is significantly better than PySide: they are roughly the same packages.2 That said, PyQt has a much more active user community, with some amazing developers, such as Phil Thompson, who quickly address bugs and other serious issues. PyQt has kept pace with Qt's version 5, while PySide is still tracking Qt 4. Nokia used to actively maintain PySide, but my understanding is they have dropped it, so there is now no longer a cadre of professionals working on active maintenance. There seem to be lots of bug reports piling up, for instance.

In my experience in the open-source world, when it comes to things like navigating install hell, finding out if something is a feature or a bug, or learning how to optimize code, community is invaluable. There is a large body of know-how that only emerges if a lot of people use something. For that reason alone, I recommend beginners use PyQt to cut their teeth.


Also, PyQt has much better documentation. I have found, countless times, for some reason PySide docs leave out crucial details about methods and classes that PyQt includes. Not sure why, but the automatic documentation generator is much better for PyQt (for one representative example, compare the online docs for QTextEdit.setAlignment method for the two frameworks).

There is another good reason: Summerfield's book is the best introductory book on Qt programming in Python, and it uses PyQt. It rescued me me from floundering as a Qt  cargo cult programmer, where I would just hunt (Google) and peck out something that sometimes worked. His book teaches the fundamentals of the framework from the ground up. Admittedly, the PySide Summer repository does take the sails out of this reason a little bit, as it should make it easier for beginners to work through his book with PySide. (Yes, this entire post is tinged with irony in a few ways).

The main exception to my argument is going to apply to a tiny fraction of beginners. Namely,  if you are working on a commercial product, and don't want to pay a licensing fee, then you should use PySide. The reason PySide exists in the first place is that PySide has a less restrictive license than PyQt. If you want to use PyQt for commercial software, you have to buy the commercial license from Riverbank Computing. This restriction does not hold for PySide.

Note many people start out with dollar signs in their eyes, but in practice if you are building a little application, and are truly a beginner, you could easily build in PyQt first while learning. If you want to commercialize the product you could easily port to PySide.

I should be clear: my argument isn't that PyQt is objectively better than PySide, but that because they are basically the same framework, for beginners I'd suggest going with the package with the most active community.

Notes
1 That is not to say the documentation is fantastic for PyQt. For someone neutral about C++ versus Python, I would recommend starting with Qt in C++. The documentation is incomparable, the number of books you can get, etc.. This post is focused on Python, as between Qt and PyQt, there is really no contest.

2 They are roughly, though not exactly, the same. The PySide binding is built using Shiboken while PyQt uses SIP. This can be a nontrivial difference, as SIP is more mature than Shiboken. Plus, PyQt is on version 5, as mentioned. The differences, as of Fall 2014, don't seem significant enough to be deciding factors. (Note added in early 2015: it is clear this will become a larger factor as time goes on. So far there is talk, but no palpable progress, in moving PySide to Qt 5).

Friday, September 12, 2014

From PyQt to PySide

My hobby the the last few weeks of the summer has been to port Mark Summerfield's book on PyQt to PySide (Qt is a GUI framework written in C++, and PySide/PyQt are Python bindings to this framework). (Note added: I have subsequently completed the project).

The work, so far, is up at Github in a repository called PySideSummer. Frankly, most of the work is in updating the code from 2008 (when Summerfield's book was written) to 2014. Even within PyQt, a lot has changed. We now have new-style signals-and-slots, lots of classes have been deprecated (e.g., QWorkspace), methods have become obsolete (e.g., QColor.light()), and there is a new API.

Now that I've been doing it a few weeks, I can translate between the two frameworks pretty quickly, but I am keeping my foot on the brakes. I'm taking my time because I want to actually understand what is going on in each chapter. I expect to do about a chapter a week until I'm done.

Next post: which is better: PyQt or PySide?

Sunday, July 13, 2014

Python IDEs: Pycharm versus Spyder

Note (added 9/29/2015) this post is a bit obsolete:  in Spyder, be sure to go to Preferences-Editor-Code Introspection/Analysis and turn on Automatic code completion.
----------------------
After just a day with Pycharm (and a few weeks with Spyder), it is clear that for PySide coding, Pycharm wins. However, for scientific computing, especially for those who prefer a quick-responding Matlab-like IDE, Spyder definitely deserves drive space.  

I've been using the Spyder IDE for a few months now. Strangely, while tab completion works in its Python shell, it is not always seamless in the editor window (as discussed at http://code.google.com/p/spyderlib/issues/detail?id=1254).

Note added: to minimize this issue, be sure to go to Preferences-Editor-Code Introspection/Analysis and turn on Automatic code completion. This has made PySide tab completion work in my editor, and now I am back to using Spyder for PySide coding, and this makes this post somewhat obsolete frankly!

I've never placed much stock in IDEs, but as I watched some excellent PySide tutorials (found at http://www.yasinuludag.com/blog/?p=98), it seemed Yasin Uludag was able to type PySide code at mach speeds partly because of the IDE he was using (and also partly because he is a badass PySide ninja). To see for myself, I installed the free version of Pycharm yesterday.

First good thing I noticed: no install hell. Installation was easy on Windows 7. It automatically saw my Anaconda distribution of Python, and automatically used iPython for command line work.

Upon firing it up, the first thing I noticed was that Pycharm was really slow to load, and also very sluggish in response to basic commands (even entering text or surfing the menu system). Thankfully, it grew more responsive over time (or perhaps my temporal expectations adapted to its intrinsic pace). Despite the slow start, after about five minutes of exploring (with the help of the Getting Started page), I started to appreciate the crazy horsepower under my fingertips.

I haven't really touched the surface of Pycharm. I still feel like a 16 year-old who just learned how to drive stick, and was given the keys to a Ferrari. A bit in over my head, but excited nonetheless. Pycharm seems seamlessly integrated with version control, unit testing frameworks, has all sorts of refactoring functionality built in, among other things I have not yet explored and have never used before. I won't go over all the details, as I am just starting to learn them myself, so if interested I'd ask Google.

Tuesday, July 08, 2014

PySide event handling: pos versus globalpos

I'm playing around with Qt in Python using PySide. It is one of the steepest learning curves I've ever been on. I figure I'll start dropping little examples here. The following is a really simple example to demonstrate the difference between the pos and globalPos of an event in a window. Fire up the program, click within the window, and then drag the window and click within it again. It will print out globalPos() and pos() of a mouse click in the command line, and should be fairly self-explanatory.
# -*- coding: utf-8 -*-  
''' 
Click to see coordinates to get a feel for pos versus globalPos of an event  
''' 
   
from PySide import QtGui, QtCore  
   
class MousePos(QtGui.QWidget):  
    def __init__(self):  
        QtGui.QWidget.__init__(self)  
        self.initUI()  
       
    def initUI(self):  
        self.setGeometry(50,50,300,250)  
        self.show()  
   
    def mousePressEvent(self,event):  
        if event.button() == QtCore.Qt.LeftButton:  
            msg="event.globalPos: <{0}, {1}>\n".format(event.globalPos().x(), event.globalPos().y())  
            msg2="event.pos(): <{0}, {1}>\n".format(event.pos().x(), event.pos().y())  
            print msg + "  " + msg2  
       
def main():  
    import sys  
    qtApp=QtGui.QApplication(sys.argv)  
    myMousePos=MousePos()  
    sys.exit(qtApp.exec_())  
   
if __name__=="__main__":  
    main()  
One of my goals is to see if this code formatting worked in blogger. I did it at codeformatter.blogspot.com but am looking for better ways to do it. I want examples to be simple: cut, paste, and it works in your interpreter. Python is all about using space for syntax, and I had to do too much futzing to get the syntax right.

Sunday, March 23, 2014

iPython: clear current line

When you have some junk on the command line, and want to clear it, many interpreters (e.g., Matlab) would use <ctrl>-c. For reasons I don't understand, in the iPython command line, <shift><esc> will clear it up (while <ctrl>-z will undo your most recent action). If you really wanna go crazy, <ctrl>-l clears the entire screen.

Saturday, February 15, 2014

Saving an entire project in Code::Blocks

You are working with projectx in Code::Blocks, and want a copy of  the entire project with all its files
(e.g., header files). You try to save your project by entering File-->Save Project As, but it only saves a single cbp file. What do you do? You could copy over all the files individually, but that would be very time consuming for complex projects.

A more efficient method exists, but is not obvious from the Code::Blocks menu system. It involves two easy steps: 
1. Save template of projectx 
With projectx open, click File-->Save Project as Template and enter whatever name you want for this template. 
2. Open a new project from that template 
Click File-->New-->From Template, then pick the name you entered In Step 1. After clicking Go the program will request a folder to place the project. When it asks if you want to change the project name, you should do so unless you want it to have the exact same name as the template from Step 1. 

That's it. Those steps should give you an exact duplicate (potentially with a different name) of projectx.