Notes to myself on little tricks and tips I find useful in Matlab. 2015 version. Last time I did this it was 2013.
Exporting surf plots for Illustrator in Matlab
Exporting surf plots is a pain, one of those things that is perennially a problem in Matlab but they seem to never get around to fixing. There are a couple of quick fixes. First, this thread is helpful. Use the painters renderer and it forces the plot to export vectorized. So something like:
print -depsc2 -painters test.eps
Or, if you want a nice self-contained program, try the export_fig package, and then you can just do something like:
print2eps('FullWidthSurfTest2')
I prefer the export_fig package, because it preserves the tickmarks and such that I spent so much time making.
Wednesday, November 18, 2015
Tuesday, February 10, 2015
PySide Tree Model V: Building trees with QTreeWidget and QStandardItemModel
Last in a series on treebuilding in PySide: see Table of Contents.
 As mentioned in post IIC, if our ultimate goal were to display a tree as simple as the one in the simpletreemodel, we would probably just use QTreeWidget or QStandardItemModel. In both cases, it is almost embarrassing how much easier it is to create the tree. This is because we don't need to roll our own model or data item classes.
In what follows, we will see how to use QTreeWidget and QStandardItemModel to create and view a read-only tree with multiple columns of data in each row. To keep it simple, we won't load data from a file, and the code only creates a very simple little tree. It would be a useful exercise to expand these examples to exactly mimic the GUI created in simpletreemodel.
QTreeWidget
While it is often poo-poohed as slow and inflexible, for simple projects QTreeWidget is extremely convenient and easy to use. Simply instantiate an instance of QTreeWidget, populate the tree with QTreeWidgetItem instances, and then call show() on the widget:
QStandardItemModel
This is only slightly more complicated than QTreeWidget. We populate the tree with lists of QStandardItems. To add a child to a row, we apply appendRow() to the first element (i.e., the first column) of the parent row:
While a tad more complicated than using QTreeWidget, this is still drastically simpler than subclassing QAbstractItemModel.
Conclusion
As is usually the case, there are many ways to get to the same destination. The route you take will depend on your goals, the complexity of your data, how much time you have to write your code, and how fast you want the program to be. As mentioned before, it would be overkill to subclass QAbstractItemModel for a data store as simple as the one in simpletreemodel. This post shows just how easy it would be to create the exact same tree with an order of magnitude less code.
Those that have read any of these posts, thanks for reading! I'll be putting a PDF of all the posts together so you don't have to fight through a maze of posts for all the information.
 As mentioned in post IIC, if our ultimate goal were to display a tree as simple as the one in the simpletreemodel, we would probably just use QTreeWidget or QStandardItemModel. In both cases, it is almost embarrassing how much easier it is to create the tree. This is because we don't need to roll our own model or data item classes.
 In what follows, we will see how to use QTreeWidget and QStandardItemModel to create and view a read-only tree with multiple columns of data in each row. To keep it simple, we won't load data from a file, and the code only creates a very simple little tree. It would be a useful exercise to expand these examples to exactly mimic the GUI created in simpletreemodel.
QTreeWidget
While it is often poo-poohed as slow and inflexible, for simple projects QTreeWidget is extremely convenient and easy to use. Simply instantiate an instance of QTreeWidget, populate the tree with QTreeWidgetItem instances, and then call show() on the widget:
1 2 3 4 5 6 7 8 9 10 11 12 13 14 15 16 17 18 19 20 21 22 23 24 25 26 | from PySide import QtGui import sys app = QtGui.QApplication(sys.argv) treeWidget = QtGui.QTreeWidget() treeWidget.setColumnCount(2) treeWidget.setHeaderLabels(['Title', 'Summary']); #First top level item and its kids item0 = QtGui.QTreeWidgetItem(treeWidget, ['Title 0', 'Summary 0']) item00 = QtGui.QTreeWidgetItem(item0, ['Title 00', 'Summary 00'] ) item01 = QtGui.QTreeWidgetItem(item0, ['Title 01', 'Summary 01']) #Second top level item and its kids item1 = QtGui.QTreeWidgetItem(treeWidget, ['Title 1', 'Summary 1']) item10 = QtGui.QTreeWidgetItem(item1, ['Title 10', 'Summary 10']) item11 = QtGui.QTreeWidgetItem(item1, ['Title 11', 'Summary 11']) item12 = QtGui.QTreeWidgetItem(item1, ['Title 12', 'Summary 12']) #Children of item11 item110 = QtGui.QTreeWidgetItem(item11, ['Title 110', 'Summary 110']) item111 = QtGui.QTreeWidgetItem(item11, ['Title 111', 'Summary 111']) treeWidget.show() sys.exit(app.exec_()) |
QStandardItemModel
This is only slightly more complicated than QTreeWidget. We populate the tree with lists of QStandardItems. To add a child to a row, we apply appendRow() to the first element (i.e., the first column) of the parent row:
1 2 3 4 5 6 7 8 9 10 11 12 13 14 15 16 17 18 19 20 21 22 23 24 25 26 27 28 29 30 31 32 33 34 35 36 | from PySide import QtGui import sys app = QtGui.QApplication(sys.argv) model = QtGui.QStandardItemModel() model.setHorizontalHeaderLabels(['Title', 'Summary']) rootItem = model.invisibleRootItem() #First top-level row and children item0 = [QtGui.QStandardItem('Title0'), QtGui.QStandardItem('Summary0')] item00 = [QtGui.QStandardItem('Title00'), QtGui.QStandardItem('Summary00')] item01 = [QtGui.QStandardItem('Title01'), QtGui.QStandardItem('Summary01')] rootItem.appendRow(item0) item0[0].appendRow(item00) item0[0].appendRow(item01) #Second top-level item and its children item1 = [QtGui.QStandardItem('Title1'), QtGui.QStandardItem('Summary1')] item10 = [QtGui.QStandardItem('Title10'), QtGui.QStandardItem('Summary10')] item11 = [QtGui.QStandardItem('Title11'), QtGui.QStandardItem('Summary11')] item12 = [QtGui.QStandardItem('Title12'), QtGui.QStandardItem('Summary12')] rootItem.appendRow(item1) item1[0].appendRow(item10) item1[0].appendRow(item11) item1[0].appendRow(item12) #Children of item11 (third level items) item110 = [QtGui.QStandardItem('Title110'), QtGui.QStandardItem('Summary110')] item111 = [QtGui.QStandardItem('Title111'), QtGui.QStandardItem('Summary111')] item11[0].appendRow(item110) item11[0].appendRow(item111) treeView= QtGui.QTreeView() treeView.setModel(model) treeView.show() sys.exit(app.exec_()) |
While a tad more complicated than using QTreeWidget, this is still drastically simpler than subclassing QAbstractItemModel.
Conclusion
As is usually the case, there are many ways to get to the same destination. The route you take will depend on your goals, the complexity of your data, how much time you have to write your code, and how fast you want the program to be. As mentioned before, it would be overkill to subclass QAbstractItemModel for a data store as simple as the one in simpletreemodel. This post shows just how easy it would be to create the exact same tree with an order of magnitude less code.
Those that have read any of these posts, thanks for reading! I'll be putting a PDF of all the posts together so you don't have to fight through a maze of posts for all the information.
Monday, February 09, 2015
PySide Tree Tutorial IV: What next?
Part of a series on treebuilding in PySide: see Table of Contents.
We have finished going over simpletreemodel. This and the final post are effectively appendices to our discussion of that example.
You have probably noticed that model/view programming is a complex subject, probably deserving book-length treatment. Tree views are the most complex built-in views there are, and hopefully we have made some headway on how to build them.
We have left out how we would handle an editable tree model (this is covered in the editabletreemodel example that comes with PySide). Nor have we addressed how to exert more precise control over how items are displayed, such as how to show html-formatted strings: this is the purview of custom delegates (a topic covered in the spinboxdelegate and stardelegate examples). We have also left open what to do if we want graphical rather than textual rendering of our data: this would involve the construction of a custom view (one example is to be found in chart).
For those that want a more principled overview of model/view programming in Python, Summerfield (2008) has three chapters on the topic. The brave can also try Summerfield (2010), for an extremely thorough treatment, and an entire chapter on trees. While the latter is not written for Python, it has tons of useful information about model-view programming if you can brave the translation from c++.
Summerfield, M (2010) Advanced Qt Programming. Prentice Hall.
Summerfield, M (2008) Rapid Gui Programming with Python and Qt. Prentice Hall.
Friday, February 06, 2015
PySide Tree Tutorial IIID: Creating the tree with setupModelData()
Part of a series on treebuilding in PySide: see Table of Contents
Recall that TreeModel uses setupModelData() to set up the initial tree structure. We provide a very brief description of its behavior here, and refer the reader to the code itself for more details (the code is in post IIIA). We begin with a text file (default.txt) that contains all the data for our tree:
Recall that TreeModel uses setupModelData() to set up the initial tree structure. We provide a very brief description of its behavior here, and refer the reader to the code itself for more details (the code is in post IIIA). We begin with a text file (default.txt) that contains all the data for our tree:
Getting Started How to familiarize yourself with Qt DesignerThe entire text file is extracted in main, and sent to setupModelData() within TreeModel. Two tab-delimited strings are extracted from each line (the title and summary), and form the basis for a new TreeItem. The location of each node in the hierarchy is determined by the pattern of indentation in the file. We construct the tree exactly as discussed in Part II, using the following rules:
Launching Designer Running the Qt Designer application
The User Interface How to interact with Qt Designer
.
.
.
Connection Editing Mode Connecting widgets together
Connecting Objects Making connections in Qt Designer
Editing Connections Changing existing connections
- For each line, create a TreeItem in which the two tab-delimited strings on that line are assigned to TreeItem.itemData (Figure 4, post IIB).
- If line N+1 is indented relative to line N, then make the (N+1)th item a child of item N.
- If line N+1 is unindented relative to line N, then make the (N+1)th item a sibling of item N's parent.
Wednesday, February 04, 2015
PySide Tree Tutorial IIIC: Index and parent
Part of a series on treebuilding in PySide: see Table of Contents
Now we get to the guts of the API, and what really separates our model from a table model. If we were just building a table model, subclassing QAbstractTableModel, our model would be done. Because we are subclassing QAbstractItemModel, we must provide two additional methods: index() and parent(). The view needs these methods to navigate among items in the tree.
We can view index() and parent() as inverse methods; parent() takes in a child index and returns the index of its parent, while index() takes in a parent index and returns the index of one of its children (Figure 7A). We implement both methods as outlined in Figure 7B, which you might want to study before looking at the details of the code: it is sometimes easy to lose the forest for the trees with these functions.
We'll start by looking at the implementation of index().
index(row, column, parent)
This method takes in the index of a parent item, and returns the index of one of its children. We implement it with:
While the basic strategy here is outlined in Figure 7B, it also has to handle some special cases. First, we check the validity of the input coordinates with hasIndex(): it determines if row and column are nonnegative and fit within the range of values allowed by parent. For instance, if the parent item has three children, hasIndex() will return False if the row argument exceeds two.
If hasIndex() returns False, then the coordinates submitted by the view are not valid, and we return the invalid index. Otherwise, we retrieve the parentItem that corresponds to parent, and then extract that item's desired child using TreeItem.child(row).
Once we have extracted the appropriate child item from its parent, we wrap it up into an index using createIndex(row, column, childItem). This is the built-in method that all models use to create new indexes. It requires that we specify the item's row number and column number, as well the TreeItem to which the resulting index will refer--this is the item that its internalPointer() will return.
Recall that each element in TreeItem.itemData corresponds to a different column in a row of our model (Figure 4, post IIB). Hence, in general there is a many-to-one relationship (in this case a 2:1 relationship) between model indexes and TreeItems. Given N rows in our tree,then 2N calls to index() would be required to specify all the indexes.
parent(index)
As discussed above, this method takes in an item's index, and returns the index of its parent:
The basic strategy is illustrated in Figure 7B, but there are a few wrinkles we should consider. First, if the index is invalid (i.e., it is the root index), then it has no parent and we return an invalid index. Also, as discussed in part IIIA, we return the invalid index as the parent of any top-level items in the model, i.e., the items whose parents are rootItem.
For all lower-level items, we create the parent index with createIndex(). This is a little more subtle than in the index() method: we must specify the row and column numbers of the parentItem relative to its parent (i.e, the grandparent of childItem). To find the row that parentItem occupies among its siblings, we use TreeItem.row(). For the column value, we follow the convention that only items in the first column of our model have children (that is, we set the column parameter for createIndex() to zero).
Conclusion
We are pretty much done going over the code. While we will briefly discuss setupModelData() in the next post, we are done going over the API provided by the model for the view. Once the tree structure and model are built, then the model is ready to be connected to a view. This is easily done with QTreeView.setModel(TreeModel). When we call show() on the view, the GUI should appear on our screen as in Figure 3 (post IIA).
Now we get to the guts of the API, and what really separates our model from a table model. If we were just building a table model, subclassing QAbstractTableModel, our model would be done. Because we are subclassing QAbstractItemModel, we must provide two additional methods: index() and parent(). The view needs these methods to navigate among items in the tree.
We can view index() and parent() as inverse methods; parent() takes in a child index and returns the index of its parent, while index() takes in a parent index and returns the index of one of its children (Figure 7A). We implement both methods as outlined in Figure 7B, which you might want to study before looking at the details of the code: it is sometimes easy to lose the forest for the trees with these functions.
 |
| Figure 7: Implementing parent() and index() A. The basic logic of parent() and index(). TreeModel.parent() takes in the index of a child and returns the index of its parent, while TreeModel.index() takes in a parent index and returns the index of one of its children. B. Details about how parent() and index() are implemented. The flow of index() is counterclockwise (red arrows), and parent() is clockwise (green arrows). In each case, the given index's associated TreeItem is retrieved using internalPointer(). Then, its parent (child) item is accessed using the child() (parent()) method that was built into TreeItem. Finally, that item's index is created using createIndex(), which takes this item as one of its parameters. Figure 7B adapted from: http://qt-project.org/doc/qt-4.8/itemviews-editabletreemodel.html |
We'll start by looking at the implementation of index().
index(row, column, parent)
This method takes in the index of a parent item, and returns the index of one of its children. We implement it with:
def index(self, row, column, parent):
    if not self.hasIndex(row, column, parent):
        return QtCore.QModelIndex()
    if not parent.isValid():
        parentItem = self.rootItem
    else:
        parentItem = parent.internalPointer() #returns item, given index
    childItem = parentItem.child(row) #the actual item we care about
    if childItem:
        return self.createIndex(row, column, childItem)
    else:
        return QtCore.QModelIndex()
If hasIndex() returns False, then the coordinates submitted by the view are not valid, and we return the invalid index. Otherwise, we retrieve the parentItem that corresponds to parent, and then extract that item's desired child using TreeItem.child(row).
Once we have extracted the appropriate child item from its parent, we wrap it up into an index using createIndex(row, column, childItem). This is the built-in method that all models use to create new indexes. It requires that we specify the item's row number and column number, as well the TreeItem to which the resulting index will refer--this is the item that its internalPointer() will return.
Recall that each element in TreeItem.itemData corresponds to a different column in a row of our model (Figure 4, post IIB). Hence, in general there is a many-to-one relationship (in this case a 2:1 relationship) between model indexes and TreeItems. Given N rows in our tree,then 2N calls to index() would be required to specify all the indexes.
parent(index)
As discussed above, this method takes in an item's index, and returns the index of its parent:
def parent(self, index):
        if not index.isValid():
            return QtCore.QModelIndex()
        childItem = index.internalPointer()
        parentItem = childItem.parent()
        if parentItem == self.rootItem:
            return QtCore.QModelIndex()
   return self.createIndex(parentItem.row(), 0, parentItem)
For all lower-level items, we create the parent index with createIndex(). This is a little more subtle than in the index() method: we must specify the row and column numbers of the parentItem relative to its parent (i.e, the grandparent of childItem). To find the row that parentItem occupies among its siblings, we use TreeItem.row(). For the column value, we follow the convention that only items in the first column of our model have children (that is, we set the column parameter for createIndex() to zero).
Conclusion
We are pretty much done going over the code. While we will briefly discuss setupModelData() in the next post, we are done going over the API provided by the model for the view. Once the tree structure and model are built, then the model is ready to be connected to a view. This is easily done with QTreeView.setModel(TreeModel). When we call show() on the view, the GUI should appear on our screen as in Figure 3 (post IIA).
Monday, February 02, 2015
PySide Tree Tutorial IIIB: QAbstractItemModel's API
Part of a series on treebuilding in PySide: see Table of Contents.
In the next two posts, we will go through the methods instantiated in our model, starting now with rowCount(), columnCount(), data(), and headerData(). In the following post we will round it out with a discussion of index() and parent(), which are especially important in hierarchical models.
Let's start with rowCount().
rowCount(parent)
The rowCount() method takes a parent index and returns the number of children the corresponding parent item has. Views call rowCount() to determine how many rows need to be displayed underneath a given parent item.
Recall that in simple, single-level data structures like tables, each item has the same (invalid) parent, so we can get away with returning a single number in response to rowCount() (Figure 2 in post IB). This strategy won't work with tree models, in which different parents typically have different numbers of children.
In our example, rowCount() is implemented as follows:
The basic strategy in rowCount() is to extract the parent index's corresponding parentItem and then return the number of children this item has using the built-in item method TreeItem.childCount(). The parentItem is extracted from its index using internalPointer(). While this might seem a strange name (Python has no pointers), you can think of internalPointer() as a getItemFromIndex() method that refers to the TreeItem corresponding to an index (Figure 6).
While the core calculation is relatively simple, there are a couple of wrinkles. First, our convention is that only the first column in a row has children, so if parent.column() is greater than 0, then rowCount() returns 0. Second, as discussed above, if the parent index is the invalid QModelIndex(), then the parent item is the root item. Finally, if the parent is not the root, then we follow the algorithm described in the previous paragraph.
columnCount(parent)
The columnCount() method takes in a parent index and returns the number of columns the corresponding parent item has. The view calls this method to ask the model how many columns to display under a parent item:
The basic algorithm is simple: extract the parent item corresponding to the given parent index, and then call TreeItem's built-in columnCount() on this parent item. As before, if the parent index is invalid, we assume the index corresponds to the root item.
data(index, role)
Given an item's index and a desired role, data() tells the view what to display at that index's location:
The model does not know when it will be used, or which data the view will ask for. It lies in wait, providing data each time the view requests it, using the universal interface.
When the role is set as DisplayRole, the view is asking what text to display at the location specified by the given index. Recall that each TreeItem contains all the data for an entire row of the tree (Figure 4, post IIB), but the view needs to know what text to display in just one column. Luckily, each index already has a built-in column() method, and each TreeItem has a built-in data() method that returns the data from column j of that item. In TreeModel.data(), we compose these two functions to pull the appropriate column of data from the item corresponding to the given index.
When querying the model with data(), the view sends the index of the item to be displayed, as well as a single role parameter (of type QtCore.Qt.itemDataRole). What exactly is this itemDataRole? Roles are sent by the view to indicate the type of data it is looking for, such as text, font styles, background color, and other information.
Each role is sent as a separate call to TreeModel.data() by the view. The model should always return values of the appropriate type for a given role. A partial list of the different roles and their expected return type is shown in Table 2. You can find an exhaustive enumeration in the PySide documentation.
Table 2: Some itemDataRoles, their descriptions, and return types.
Our simpletreemodel example only supports the DisplayRole. However, it is instructive to play around with other roles. For instance you could try adding:
This will display the helpful tooltip "Scalawag!" over each item in the view when you hover over it with your mouse. To change the background color in the first column of the tree, try this:
The result is ugly, to be sure, but it's the principal that matters.
Some developers argue that this functionality, whereby the model controls how items appear, violates the desired division of labor between views and models. This is a valid concern, and some programmers leave all such appearance customization to delegates. But since we are ignoring delegates for now, it is useful to know how to sneak formatting in via the model.
headerData(section, orientation, role)
The headerData() function extracts the header data from the root item, and paints it in the column headers:
headerData() works similarly to TreeModel.data(). Note also that section is a generic term for the row or column number, depending on whether the orientation is vertical or horizontal, respectively.
In the next two posts, we will go through the methods instantiated in our model, starting now with rowCount(), columnCount(), data(), and headerData(). In the following post we will round it out with a discussion of index() and parent(), which are especially important in hierarchical models.
Let's start with rowCount().
rowCount(parent)
The rowCount() method takes a parent index and returns the number of children the corresponding parent item has. Views call rowCount() to determine how many rows need to be displayed underneath a given parent item.
Recall that in simple, single-level data structures like tables, each item has the same (invalid) parent, so we can get away with returning a single number in response to rowCount() (Figure 2 in post IB). This strategy won't work with tree models, in which different parents typically have different numbers of children.
In our example, rowCount() is implemented as follows:
def rowCount(self, parent):
    if parent.column() > 0:
        return 0
    if not parent.isValid():
        parentItem = self.rootItem
    else:
        parentItem = parent.internalPointer()
    return parentItem.childCount()
The basic strategy in rowCount() is to extract the parent index's corresponding parentItem and then return the number of children this item has using the built-in item method TreeItem.childCount(). The parentItem is extracted from its index using internalPointer(). While this might seem a strange name (Python has no pointers), you can think of internalPointer() as a getItemFromIndex() method that refers to the TreeItem corresponding to an index (Figure 6).
 |
| Figure 6: internalPointer() pulls an item from an index. Each index includes an internalPointer() method that returns the TreeItem associated with that index. |
While the core calculation is relatively simple, there are a couple of wrinkles. First, our convention is that only the first column in a row has children, so if parent.column() is greater than 0, then rowCount() returns 0. Second, as discussed above, if the parent index is the invalid QModelIndex(), then the parent item is the root item. Finally, if the parent is not the root, then we follow the algorithm described in the previous paragraph.
columnCount(parent)
The columnCount() method takes in a parent index and returns the number of columns the corresponding parent item has. The view calls this method to ask the model how many columns to display under a parent item:
def columnCount(self, parent):
    if not parent.isValid():
        return self.rootItem.columnCount()
    else:
        return parent.internalPointer().columnCount()
The basic algorithm is simple: extract the parent item corresponding to the given parent index, and then call TreeItem's built-in columnCount() on this parent item. As before, if the parent index is invalid, we assume the index corresponds to the root item.
data(index, role)
Given an item's index and a desired role, data() tells the view what to display at that index's location:
def data(self, index, role):
    if not index.isValid():
        return None
    if role != QtCore.Qt.DisplayRole:
        return None
    item = index.internalPointer()
    return item.data(index.column())
The model does not know when it will be used, or which data the view will ask for. It lies in wait, providing data each time the view requests it, using the universal interface.
When the role is set as DisplayRole, the view is asking what text to display at the location specified by the given index. Recall that each TreeItem contains all the data for an entire row of the tree (Figure 4, post IIB), but the view needs to know what text to display in just one column. Luckily, each index already has a built-in column() method, and each TreeItem has a built-in data() method that returns the data from column j of that item. In TreeModel.data(), we compose these two functions to pull the appropriate column of data from the item corresponding to the given index.
When querying the model with data(), the view sends the index of the item to be displayed, as well as a single role parameter (of type QtCore.Qt.itemDataRole). What exactly is this itemDataRole? Roles are sent by the view to indicate the type of data it is looking for, such as text, font styles, background color, and other information.
Each role is sent as a separate call to TreeModel.data() by the view. The model should always return values of the appropriate type for a given role. A partial list of the different roles and their expected return type is shown in Table 2. You can find an exhaustive enumeration in the PySide documentation.
| Role | Description | Expected return type |
| DisplayRole | Data to be displayed as text. | Python str |
| ToolTipRole | Text to temporarily display when you hover mouse over an item. | Python str |
| FontRole | Font with which to render items. | QtGui.QFont |
| TextAlignmentRole | Text alignment for item. | QtCore.Qt.AlignmentFlag |
| BackgroundRole | Set background color. | QtGui.QBrush |
Table 2: Some itemDataRoles, their descriptions, and return types.
Our simpletreemodel example only supports the DisplayRole. However, it is instructive to play around with other roles. For instance you could try adding:
if role == QtCore.Qt.ToolTipRole:
    return "Scalawag!"
This will display the helpful tooltip "Scalawag!" over each item in the view when you hover over it with your mouse. To change the background color in the first column of the tree, try this:
if role == QtCore.Qt.BackgroundRole:
    if index.column() == 0:
        return QtGui.QBrush(QtGui.QColor(QtCore.Qt.yellow))
The result is ugly, to be sure, but it's the principal that matters.
Some developers argue that this functionality, whereby the model controls how items appear, violates the desired division of labor between views and models. This is a valid concern, and some programmers leave all such appearance customization to delegates. But since we are ignoring delegates for now, it is useful to know how to sneak formatting in via the model.
headerData(section, orientation, role)
The headerData() function extracts the header data from the root item, and paints it in the column headers:
def headerData(self, section, orientation, role):
    if orientation==QtCore.Qt.Horizontal and role==QtCore.Qt.DisplayRole:
        return self.rootItem.data(section)
    return None
headerData() works similarly to TreeModel.data(). Note also that section is a generic term for the row or column number, depending on whether the orientation is vertical or horizontal, respectively.
Saturday, January 31, 2015
PySide Tree Tutorial IIIA: Introducing the TreeModel class
Part of a series on treebuilding in PySide: see Table of Contents.
We discussed models in abstract terms in Part I, then showed how to build a Python tree structure in Part II, and now we will look in more concrete terms how to construct our TreeModel, which is subclassed from QAbstractItemModel.
Recall from Part I that the TreeModel class instantiates the API required by the view, acting as a wrapper for the hierarchical data structure discussed in Part II. The TreeModel class is defined as follows:
Each TreeModel instance is initialized with:
The model invokes setupModelData() to create the hierarchical tree structure discussed in Part II. We will discuss this method briefly in post IIID. Recall that the rootItem is the highest-level node in the tree structure, and is the parent of each top-level item in the tree (Figure 5, post IIB).
Within TreeModel, every method except setupModelData() is part of the API for use by the view. In post IA, we mentioned that the complexity of the API will depend on the type of model you are building. Because we are subclassing QAbstractItemModel, our API must include five methods: rowCount(), columnCount(), data(), index(), and parent(). Further, while it is optional, most models also provide a headerData() method, and ours is no exception.
The view uses index() and parent() to help it navigate the tree structure. Recall from post IIB that indexes are a kind of lingua franca used for interactions between models and views. While the model creates all the indexes and sends them to the view, they don't just disappear there. Rather, the view, in turn, sends these indexes back to the model as parameters when making queries, to specify which item it is asking about.
We have read a lot about indexes up until now: what, exactly, is an index? An index is really just a bundle of methods. While some of the methods are used to locate items in the model, there is additional functionality, some described in Table 1. We'll see each of the methods from Table 1 used in TreeModel: see the online documentation for a full inventory.
Table 1: Index methods
There is one index that deserves special attention, as it will be used in every method in the model's API: the invalid or null model index. Instantiated with QtCore.QModelIndex(), it is unique in that its row() and column() methods return invalid negative values, and its internalPointer() method returns None. This indicates that it contains no data for the view to display in the tree. Interestingly, the root item in our tree is assigned the invalid index, so in that sense the invalid index is the parent index of all top-level items in the model.
While we call its index the 'invalid' index, this isn't to say that the root index is unimportant to the view. In its initial rendering of the tree, the view starts by looking at all the items that have the invalid parent index, and then moves down from there, traversing the tree to determine which items to show. So the invalid index acts as a virtual apical index in our tree structure, serving as the place where the buck stops when the view is looking for data to display.
In the next two posts, we will go through the methods instantiated in TreeModel.
We discussed models in abstract terms in Part I, then showed how to build a Python tree structure in Part II, and now we will look in more concrete terms how to construct our TreeModel, which is subclassed from QAbstractItemModel.
Recall from Part I that the TreeModel class instantiates the API required by the view, acting as a wrapper for the hierarchical data structure discussed in Part II. The TreeModel class is defined as follows:
1 2 3 4 5 6 7 8 9 10 11 12 13 14 15 16 17 18 19 20 21 22 23 24 25 26 27 28 29 30 31 32 33 34 35 36 37 38 39 40 41 42 43 44 45 46 47 48 49 50 51 52 53 54 55 56 57 58 59 60 61 62 63 64 65 66 67 68 69 70 71 72 73 74 75 76 77 78 79 80 81 82 83 84 85 86 87 88 | class TreeModel(QtCore.QAbstractItemModel): def __init__(self, data, parent=None): super(TreeModel, self).__init__(parent) self.rootItem = TreeItem(("Title", "Summary")) self.setupModelData(data.split('\n'), self.rootItem) def columnCount(self, parent): if parent.isValid(): return parent.internalPointer().columnCount() else: return self.rootItem.columnCount() def data(self, index, role): if not index.isValid(): return None if role != QtCore.Qt.DisplayRole: return None item = index.internalPointer() return item.data(index.column()) def flags(self, index): if not index.isValid(): return QtCore.Qt.NoItemFlags return QtCore.Qt.ItemIsEnabled | QtCore.Qt.ItemIsSelectable def headerData(self, section, orientation, role): if orientation == QtCore.Qt.Horizontal and role == QtCore.Qt.DisplayRole: return self.rootItem.data(section) return None def index(self, row, column, parent): if not self.hasIndex(row, column, parent): return QtCore.QModelIndex() if not parent.isValid(): parentItem = self.rootItem else: parentItem = parent.internalPointer() childItem = parentItem.child(row) if childItem: return self.createIndex(row, column, childItem) else: return QtCore.QModelIndex() def parent(self, index): if not index.isValid(): return QtCore.QModelIndex() childItem = index.internalPointer() parentItem = childItem.parent() if parentItem == self.rootItem: return QtCore.QModelIndex() return self.createIndex(parentItem.row(), 0, parentItem) def rowCount(self, parent): if parent.column() > 0: return 0 if not parent.isValid(): parentItem = self.rootItem else: parentItem = parent.internalPointer() return parentItem.childCount() def setupModelData(self, lines, parent): parents = [parent] indentations = [0] number = 0 while number < len(lines): position = 0 while position < len(lines[number]): if lines[number][position] != ' ': break position += 1 lineData = lines[number][position:].strip() if lineData: # Read the column data from the rest of the line. columnData = [s for s in lineData.split('\t') if s] if position > indentations[-1]: # The last child of the current parent is now the new # parent unless the current parent has no children. if parents[-1].childCount() > 0: parents.append(parents[-1].child(parents[-1].childCount() - 1)) indentations.append(position) else: while position < indentations[-1] and len(parents) > 0: parents.pop() indentations.pop() # Append a new item to the current parent's list of children. parents[-1].appendChild(TreeItem(columnData, parents[-1])) number += 1 |
Each TreeModel instance is initialized with:
    def __init__(self, data, parent=None):
        super(TreeModel, self).__init__(parent)
        self.rootItem = TreeItem(("Title", "Summary"))
        self.setupModelData(data.split('\n'), self.rootItem)
The model invokes setupModelData() to create the hierarchical tree structure discussed in Part II. We will discuss this method briefly in post IIID. Recall that the rootItem is the highest-level node in the tree structure, and is the parent of each top-level item in the tree (Figure 5, post IIB).
Within TreeModel, every method except setupModelData() is part of the API for use by the view. In post IA, we mentioned that the complexity of the API will depend on the type of model you are building. Because we are subclassing QAbstractItemModel, our API must include five methods: rowCount(), columnCount(), data(), index(), and parent(). Further, while it is optional, most models also provide a headerData() method, and ours is no exception.
The view uses index() and parent() to help it navigate the tree structure. Recall from post IIB that indexes are a kind of lingua franca used for interactions between models and views. While the model creates all the indexes and sends them to the view, they don't just disappear there. Rather, the view, in turn, sends these indexes back to the model as parameters when making queries, to specify which item it is asking about.
We have read a lot about indexes up until now: what, exactly, is an index? An index is really just a bundle of methods. While some of the methods are used to locate items in the model, there is additional functionality, some described in Table 1. We'll see each of the methods from Table 1 used in TreeModel: see the online documentation for a full inventory.
| Method | Description |
| index.row() | Returns the row number of the index. |
| index.column() | Returns the column number of the index. |
| index.parent() | Returns the index of the parent corresponding to the given index. |
| index.internalPointer() | Returns the TreeItem corresponding to index. |
| index.isValid() | Returns True if the index is valid, False otherwise. |
There is one index that deserves special attention, as it will be used in every method in the model's API: the invalid or null model index. Instantiated with QtCore.QModelIndex(), it is unique in that its row() and column() methods return invalid negative values, and its internalPointer() method returns None. This indicates that it contains no data for the view to display in the tree. Interestingly, the root item in our tree is assigned the invalid index, so in that sense the invalid index is the parent index of all top-level items in the model.
While we call its index the 'invalid' index, this isn't to say that the root index is unimportant to the view. In its initial rendering of the tree, the view starts by looking at all the items that have the invalid parent index, and then moves down from there, traversing the tree to determine which items to show. So the invalid index acts as a virtual apical index in our tree structure, serving as the place where the buck stops when the view is looking for data to display.
In the next two posts, we will go through the methods instantiated in TreeModel.
Thursday, January 29, 2015
PySide Tree Tutorial IID: Adding helper methods to TreeItem
Part of a series on treebuilding in PySide: see Table of Contents.
In part IIB we saw how to build a tree structure out of TreeItem instances. What we didn't discuss there is that each TreeItem comes packed with additional methods that will help us construct our tree model. Most of these methods let us extract simple data from a TreeItem, such as its parent, or the text from one of its columns. In this post, we'll go over these methods.
Via the child() method, an item returns one of its children from the given row:
Recall from Figure 2 (post IB) that in tree models, children are arranged as a set of rows underneath their parents. Hence, to pick child n from a parent, just select the nth member from the parent's childItems list.
The number of children an item has is calculated in childCount():
This just returns the length of the list that contains all the children.
The row() method reports an item's position among its siblings. For example, in Figure 5 (post IIB), the item marked A occupies row 0 among its siblings, while item D has the same parent, and occupies row 1. Item C is a child of A, and occupies row 1 among A's children.
row() is implemented as follows:
We should note a couple of things about row(). First, index() in this case has nothing to do with the model indexes mentioned in post IB: it is simply the built-in Python method that returns the index at which a given value occurs in a list. Second, our convention is that the root item is automatically assigned to row 0, even though it has no parent (Figure 5).
The number of columns of data associated with an item is returned by columnCount():
Each item in our data structure contains the same number of columns, so we could have simply returned 2, but we have opted for a more general approach.
The data() method lets you extract the textual data from a particular column in a row (recall Figure 4, post IIB). It simply retrieves the text from the appropriate column stored in itemData:
Note that data() returns None if the column index is out of range.
An item's parent is returned, surprisingly enough, from parent():
This will return None for the root node.
Summary
There you have it: we have built a beautiful tree of data, along with some methods that the model will use to extract different features of its nodes. What is interesting is that, up until now, we have officially done zero PySide programming. We have done all our work with standard Python classes, without importing QtGui, QtCore, or any other PySide classes. In the next section we will finally do some PySide programming, and look at how to wrap a model around this tree.
In part IIB we saw how to build a tree structure out of TreeItem instances. What we didn't discuss there is that each TreeItem comes packed with additional methods that will help us construct our tree model. Most of these methods let us extract simple data from a TreeItem, such as its parent, or the text from one of its columns. In this post, we'll go over these methods.
Via the child() method, an item returns one of its children from the given row:
def child(self, row):
    return self.childItems[row]
Recall from Figure 2 (post IB) that in tree models, children are arranged as a set of rows underneath their parents. Hence, to pick child n from a parent, just select the nth member from the parent's childItems list.
The number of children an item has is calculated in childCount():
def childCount(self):
    return len(self.childItems)
This just returns the length of the list that contains all the children.
The row() method reports an item's position among its siblings. For example, in Figure 5 (post IIB), the item marked A occupies row 0 among its siblings, while item D has the same parent, and occupies row 1. Item C is a child of A, and occupies row 1 among A's children.
row() is implemented as follows:
def row(self):
    if self.parentItem:
        return self.parentItem.childItems.index(self)
    return 0
We should note a couple of things about row(). First, index() in this case has nothing to do with the model indexes mentioned in post IB: it is simply the built-in Python method that returns the index at which a given value occurs in a list. Second, our convention is that the root item is automatically assigned to row 0, even though it has no parent (Figure 5).
The number of columns of data associated with an item is returned by columnCount():
def columnCount(self):
    return len(self.itemData)
Each item in our data structure contains the same number of columns, so we could have simply returned 2, but we have opted for a more general approach.
The data() method lets you extract the textual data from a particular column in a row (recall Figure 4, post IIB). It simply retrieves the text from the appropriate column stored in itemData:
def data(self, column):
    try:
        return self.itemData[column]
    except IndexError:
        return None
Note that data() returns None if the column index is out of range.
An item's parent is returned, surprisingly enough, from parent():
def parent(self):
    return self.parentItem
This will return None for the root node.
Summary
There you have it: we have built a beautiful tree of data, along with some methods that the model will use to extract different features of its nodes. What is interesting is that, up until now, we have officially done zero PySide programming. We have done all our work with standard Python classes, without importing QtGui, QtCore, or any other PySide classes. In the next section we will finally do some PySide programming, and look at how to wrap a model around this tree.
Tuesday, January 27, 2015
PySide Tree Tutorial IIC: Cross-examining simpletreemodel
Part of a series on treebuilding in PySide: see Table of Contents.
In this tutorial, we are following simpletreemodel to the letter, simply trying to understand the code as given. But we should not assume that there is no room for improvement. For instance, in the code in post IIB, when initializing a TreeItem it would be helpful to add:
This would let us add a child to its parent immediately, right when the child is created. A significant simplification of the code. If you have other ways we might optimize the code, by all means let us know in the comments!
Further, if our goal was truly to build a simple, read-only model with a data store as small as the one that comes with this example, then we would weigh options other than QAbstractItemModel. In particular, we would want to consider using QTreeWidget or QStandardItemModel, which provide simplicity and ease-of-use in exchange for diminished speed and flexibility. In Part V, we will see how to create a tree like the one in our example using these tools. You'll see that the code is much simpler.
However, for larger models that require more flexibility and speed, you will probably end up subclassing QAbstractItemModel. In that case, simpletreemodel provides a useful template. While it was never meant to be a fully optimized industrial-grade example, it is helpful precisely because it provides a minimal working prototype to help people get their bearings, and contains little extraneous fluff.
In this tutorial, we are following simpletreemodel to the letter, simply trying to understand the code as given. But we should not assume that there is no room for improvement. For instance, in the code in post IIB, when initializing a TreeItem it would be helpful to add:
if parent is not None:
      parent.appendChild(self)
This would let us add a child to its parent immediately, right when the child is created. A significant simplification of the code. If you have other ways we might optimize the code, by all means let us know in the comments!
Further, if our goal was truly to build a simple, read-only model with a data store as small as the one that comes with this example, then we would weigh options other than QAbstractItemModel. In particular, we would want to consider using QTreeWidget or QStandardItemModel, which provide simplicity and ease-of-use in exchange for diminished speed and flexibility. In Part V, we will see how to create a tree like the one in our example using these tools. You'll see that the code is much simpler.
However, for larger models that require more flexibility and speed, you will probably end up subclassing QAbstractItemModel. In that case, simpletreemodel provides a useful template. While it was never meant to be a fully optimized industrial-grade example, it is helpful precisely because it provides a minimal working prototype to help people get their bearings, and contains little extraneous fluff.
Monday, January 26, 2015
PySide Tree Tutorial IIB: From TreeItem to tree structure
Part of a series on treebuilding in PySide: see Table of Contents.
Recall from post IIA that the two classes we will focus on most are TreeItem and TreeModel. We'll start with TreeItem.
Each instance of TreeItem represents a node in our data tree, and we will bind multiple such items together into a hierarchical representation of all the data in our data set. As we will see, each node contains the text from one row of the model, as well as information about that node's relationship to other nodes in the tree.
The TreeItem class is defined as follows:
When instantiated, a TreeItem receives two inputs: data (a two-element list of strings) and parent (which is typically another TreeItem):
Each TreeItem stores important data about its node. As illustrated in Figure 4, each node contains a full row of data, which consists of two columns (the title and summary). This columnar data is contained in itemData as a two-element list of strings.
In addition to storing an item's first-order data in itemData, each TreeItem also contains attributes that specify the item's place in the tree structure. Namely, it includes the item's parent (parent) as well as a list of the item's children (childItems). We can fully specify our tree's topography by appropriately setting these attributes for each node.
We can build our data tree using a simple and intuitive construction procedure. First, create the root TreeItem, which is the node with no parents. That is, the root item is the ancestor of all nodes in the tree, but a child of none:
Note that the root's itemData contains the model's horizontal header data, but this is just for convenience: we could just as easily have sent it two empty strings. To attach children to the root item, we call TreeItem again, but with rootItem as the parent:
Then, to add a child to one of these items, for instance to give child0 a child, we would follow the exact same procedure:
Such iterative construction of TreeItems is all we need to generate our tree's basic skeleton, like the one illustrated in Figure 5.
There is one more step we must take to finish building our basic tree: we must fill in values for the childItems attribute. You probably noticed that when initialized, the childItems list started out empty. Once we have a population of TreeItems connected appropriately, we can use TreeItem.appendChild() to populate childItems:
For instance, to add the children to the items defined above:
Once we have appended all the children to each item, then we are done building the tree! This tree structure serves as the data store with which our model will directly interact.
Note that the simpletreemodel example is a read-only model, so once the tree is grown it is frozen in place: its topography never changes. Hence, we will see (Part III) that appendChild() is only used in one place in our code: when initially constructing the tree with setupModelData(). Therein, creating a node and appending it to its parent are done in one line. For instance:
This line carries out the same operations as above, but in a more compact way.
If building a tree was our only goal, we would be done. But we want to display this tree using PySide. Since our model will need to provide certain methods for use by the view, we supplement each TreeItem instance with some additional methods that will help us build the model in Part III. We'll briefly look at each of these methods in Post IID.
But first, as an aside in Post IIC, we will briefly discuss other ways we might build a tree in PySide.
Recall from post IIA that the two classes we will focus on most are TreeItem and TreeModel. We'll start with TreeItem.
Each instance of TreeItem represents a node in our data tree, and we will bind multiple such items together into a hierarchical representation of all the data in our data set. As we will see, each node contains the text from one row of the model, as well as information about that node's relationship to other nodes in the tree.
The TreeItem class is defined as follows:
1 2 3 4 5 6 7 8 9 10 11 12 13 14 15 16 17 18 19 20 21 22 23 24 25 26 27 28 29 30 31 | class TreeItem(object): def __init__(self, data, parent=None): self.parentItem = parent self.itemData = data self.childItems = [] def appendChild(self, item): self.childItems.append(item) def child(self, row): return self.childItems[row] def childCount(self): return len(self.childItems) def columnCount(self): return len(self.itemData) def data(self, column): try: return self.itemData[column] except IndexError: return None def parent(self): return self.parentItem def row(self): if self.parentItem: return self.parentItem.childItems.index(self) return 0 |
When instantiated, a TreeItem receives two inputs: data (a two-element list of strings) and parent (which is typically another TreeItem):
def __init__(self, data, parent=None):
    self.parentItem = parent
    self.itemData = data
    self.childItems = []
Each TreeItem stores important data about its node. As illustrated in Figure 4, each node contains a full row of data, which consists of two columns (the title and summary). This columnar data is contained in itemData as a two-element list of strings.
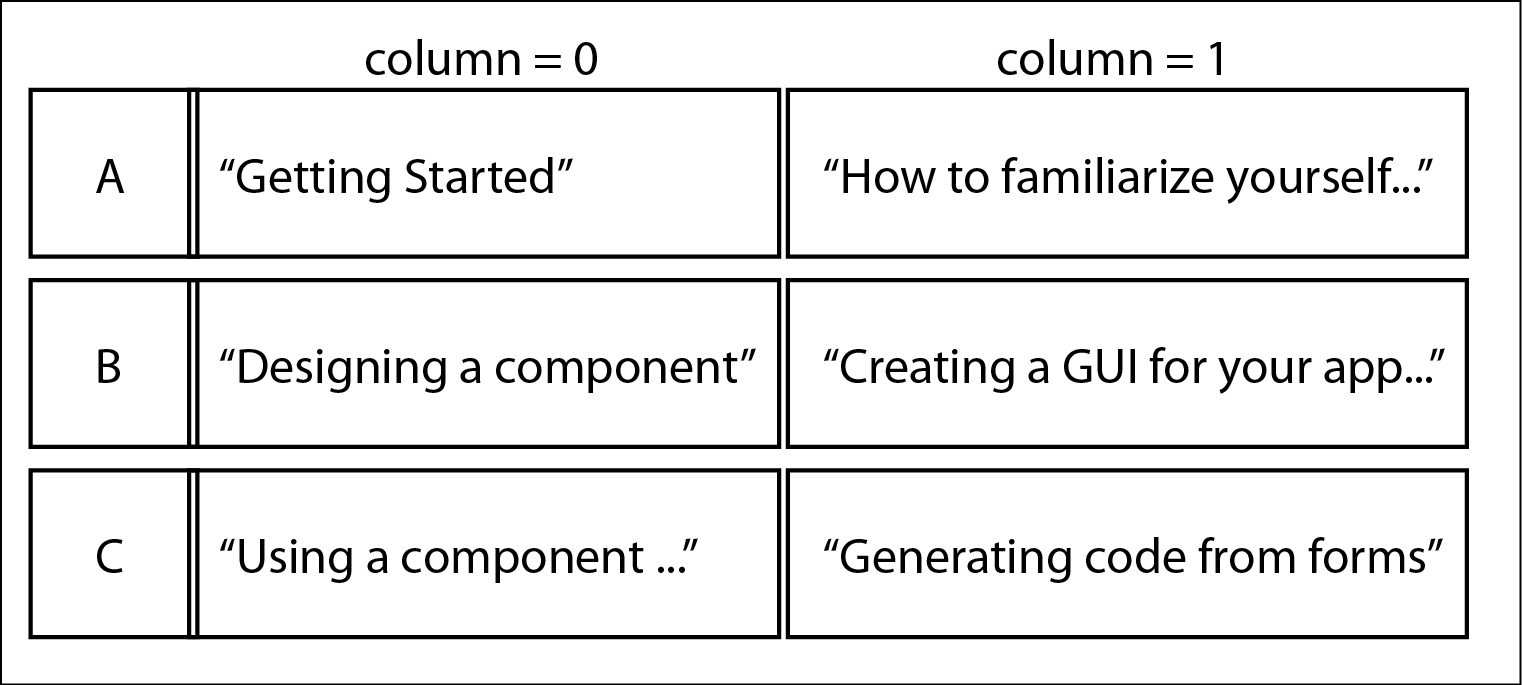 |
| Figure 4: Each TreeItem represents a row of the model The diagram depicts how the title and summary information are stored in TreeItems A, B and C. Each TreeItem represents a row of data. The itemData attribute is a list that contains the data from each column. For instance, B.itemData[1] contains the string "Creating a GUI for your application." |
In addition to storing an item's first-order data in itemData, each TreeItem also contains attributes that specify the item's place in the tree structure. Namely, it includes the item's parent (parent) as well as a list of the item's children (childItems). We can fully specify our tree's topography by appropriately setting these attributes for each node.
We can build our data tree using a simple and intuitive construction procedure. First, create the root TreeItem, which is the node with no parents. That is, the root item is the ancestor of all nodes in the tree, but a child of none:
rootItem = TreeItem(["Title", "Summary"], parent = None)
Note that the root's itemData contains the model's horizontal header data, but this is just for convenience: we could just as easily have sent it two empty strings. To attach children to the root item, we call TreeItem again, but with rootItem as the parent:
child0 = TreeItem(["Getting Started", "How to familiarize yourself..."], rootItem)
child1 = TreeItem(["Designing a component", "Creating a GUI for your app..."], rootItem)
Then, to add a child to one of these items, for instance to give child0 a child, we would follow the exact same procedure:
child00 = TreeItem(["Launching designer", "Running the Qt Designer app..."], child0)
Such iterative construction of TreeItems is all we need to generate our tree's basic skeleton, like the one illustrated in Figure 5.
 |
| Figure 5: The tree is built out of TreeItems. TreeItems are connected together into a tree. As described in the text, we start with the root item, and proceed from there, instantiating new TreeItems with the root item as the parent, iterating this process until we have constructed the entire tree. Each item's row number, relative to its siblings, is indicated to the right. |
There is one more step we must take to finish building our basic tree: we must fill in values for the childItems attribute. You probably noticed that when initialized, the childItems list started out empty. Once we have a population of TreeItems connected appropriately, we can use TreeItem.appendChild() to populate childItems:
def appendChild(self, item):
    self.childItems.append(item)
For instance, to add the children to the items defined above:
rootItem.appendChild(child0)
rootItem.appendChild(child1)
child0.appendChild(child00)
Once we have appended all the children to each item, then we are done building the tree! This tree structure serves as the data store with which our model will directly interact.
Note that the simpletreemodel example is a read-only model, so once the tree is grown it is frozen in place: its topography never changes. Hence, we will see (Part III) that appendChild() is only used in one place in our code: when initially constructing the tree with setupModelData(). Therein, creating a node and appending it to its parent are done in one line. For instance:
rootItem.appendChild(TreeItem(["Getting Started", "How to familiarize yourself..."], rootItem)
This line carries out the same operations as above, but in a more compact way.
If building a tree was our only goal, we would be done. But we want to display this tree using PySide. Since our model will need to provide certain methods for use by the view, we supplement each TreeItem instance with some additional methods that will help us build the model in Part III. We'll briefly look at each of these methods in Post IID.
But first, as an aside in Post IIC, we will briefly discuss other ways we might build a tree in PySide.
Subscribe to:
Posts (Atom)