We discussed models in abstract terms in Part I, then showed how to build a Python tree structure in Part II, and now we will look in more concrete terms how to construct our TreeModel, which is subclassed from QAbstractItemModel.
Recall from Part I that the TreeModel class instantiates the API required by the view, acting as a wrapper for the hierarchical data structure discussed in Part II. The TreeModel class is defined as follows:
1 2 3 4 5 6 7 8 9 10 11 12 13 14 15 16 17 18 19 20 21 22 23 24 25 26 27 28 29 30 31 32 33 34 35 36 37 38 39 40 41 42 43 44 45 46 47 48 49 50 51 52 53 54 55 56 57 58 59 60 61 62 63 64 65 66 67 68 69 70 71 72 73 74 75 76 77 78 79 80 81 82 83 84 85 86 87 88 | class TreeModel(QtCore.QAbstractItemModel): def __init__(self, data, parent=None): super(TreeModel, self).__init__(parent) self.rootItem = TreeItem(("Title", "Summary")) self.setupModelData(data.split('\n'), self.rootItem) def columnCount(self, parent): if parent.isValid(): return parent.internalPointer().columnCount() else: return self.rootItem.columnCount() def data(self, index, role): if not index.isValid(): return None if role != QtCore.Qt.DisplayRole: return None item = index.internalPointer() return item.data(index.column()) def flags(self, index): if not index.isValid(): return QtCore.Qt.NoItemFlags return QtCore.Qt.ItemIsEnabled | QtCore.Qt.ItemIsSelectable def headerData(self, section, orientation, role): if orientation == QtCore.Qt.Horizontal and role == QtCore.Qt.DisplayRole: return self.rootItem.data(section) return None def index(self, row, column, parent): if not self.hasIndex(row, column, parent): return QtCore.QModelIndex() if not parent.isValid(): parentItem = self.rootItem else: parentItem = parent.internalPointer() childItem = parentItem.child(row) if childItem: return self.createIndex(row, column, childItem) else: return QtCore.QModelIndex() def parent(self, index): if not index.isValid(): return QtCore.QModelIndex() childItem = index.internalPointer() parentItem = childItem.parent() if parentItem == self.rootItem: return QtCore.QModelIndex() return self.createIndex(parentItem.row(), 0, parentItem) def rowCount(self, parent): if parent.column() > 0: return 0 if not parent.isValid(): parentItem = self.rootItem else: parentItem = parent.internalPointer() return parentItem.childCount() def setupModelData(self, lines, parent): parents = [parent] indentations = [0] number = 0 while number < len(lines): position = 0 while position < len(lines[number]): if lines[number][position] != ' ': break position += 1 lineData = lines[number][position:].strip() if lineData: # Read the column data from the rest of the line. columnData = [s for s in lineData.split('\t') if s] if position > indentations[-1]: # The last child of the current parent is now the new # parent unless the current parent has no children. if parents[-1].childCount() > 0: parents.append(parents[-1].child(parents[-1].childCount() - 1)) indentations.append(position) else: while position < indentations[-1] and len(parents) > 0: parents.pop() indentations.pop() # Append a new item to the current parent's list of children. parents[-1].appendChild(TreeItem(columnData, parents[-1])) number += 1 |
Each TreeModel instance is initialized with:
    def __init__(self, data, parent=None):
        super(TreeModel, self).__init__(parent)
        self.rootItem = TreeItem(("Title", "Summary"))
        self.setupModelData(data.split('\n'), self.rootItem)
The model invokes setupModelData() to create the hierarchical tree structure discussed in Part II. We will discuss this method briefly in post IIID. Recall that the rootItem is the highest-level node in the tree structure, and is the parent of each top-level item in the tree (Figure 5, post IIB).
Within TreeModel, every method except setupModelData() is part of the API for use by the view. In post IA, we mentioned that the complexity of the API will depend on the type of model you are building. Because we are subclassing QAbstractItemModel, our API must include five methods: rowCount(), columnCount(), data(), index(), and parent(). Further, while it is optional, most models also provide a headerData() method, and ours is no exception.
The view uses index() and parent() to help it navigate the tree structure. Recall from post IIB that indexes are a kind of lingua franca used for interactions between models and views. While the model creates all the indexes and sends them to the view, they don't just disappear there. Rather, the view, in turn, sends these indexes back to the model as parameters when making queries, to specify which item it is asking about.
We have read a lot about indexes up until now: what, exactly, is an index? An index is really just a bundle of methods. While some of the methods are used to locate items in the model, there is additional functionality, some described in Table 1. We'll see each of the methods from Table 1 used in TreeModel: see the online documentation for a full inventory.
| Method | Description |
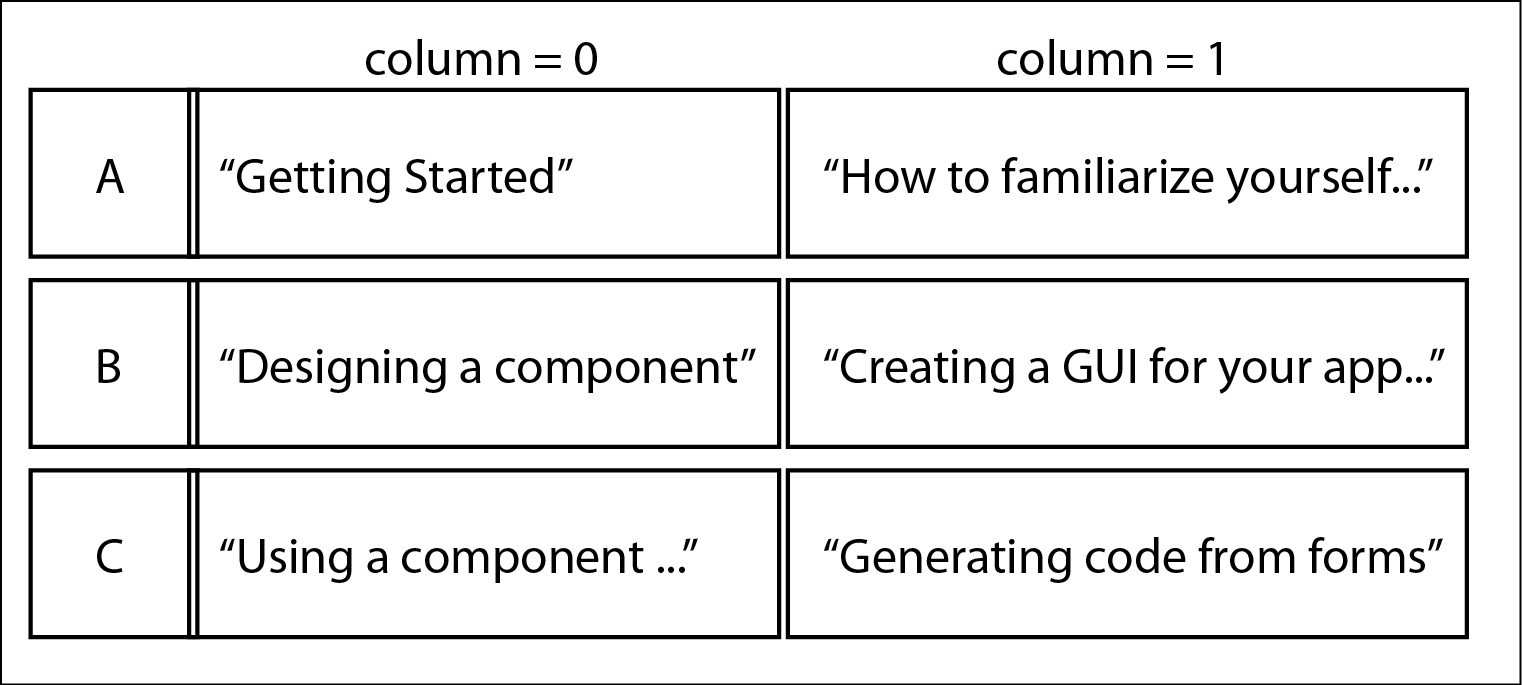
| index.row() | Returns the row number of the index. |
| index.column() | Returns the column number of the index. |
| index.parent() | Returns the index of the parent corresponding to the given index. |
| index.internalPointer() | Returns the TreeItem corresponding to index. |
| index.isValid() | Returns True if the index is valid, False otherwise. |
There is one index that deserves special attention, as it will be used in every method in the model's API: the invalid or null model index. Instantiated with QtCore.QModelIndex(), it is unique in that its row() and column() methods return invalid negative values, and its internalPointer() method returns None. This indicates that it contains no data for the view to display in the tree. Interestingly, the root item in our tree is assigned the invalid index, so in that sense the invalid index is the parent index of all top-level items in the model.
While we call its index the 'invalid' index, this isn't to say that the root index is unimportant to the view. In its initial rendering of the tree, the view starts by looking at all the items that have the invalid parent index, and then moves down from there, traversing the tree to determine which items to show. So the invalid index acts as a virtual apical index in our tree structure, serving as the place where the buck stops when the view is looking for data to display.
In the next two posts, we will go through the methods instantiated in TreeModel.